Luckily, my lovely wife helps me chronicle my adventures in pictures, so all is not lost as to this busy time in my life. One of my many adventures has been, now that we have our own place, to build a bigger and better meat smoker.
 There were many considerations that led to this project. First, my previous homemade smoker has some shortcomings, both is size and in reliability (I was rewiring it almost every time we used it). Second, I had long toyed with the idea of building bigger and better smokers of various kinds whose designs can be found all over the internet. Third, I came across someone on Craig's List who had downed a very old apple tree and was looking to get rid of about a cord of apple wood for a good price (for the uninitiate, a cord is the amount of wood that would fit in a stacked pile with dimensions 4'x4'x8'). Fourth, I came across someone selling food grade 55 gallon drums for $8 each (both steel and plastic) and was able to convince my wife that I could get a couple of plastic drums to make her a pair of rain barrels (which I did) and also get a couple of metal drums to make a meat smoker.
Having found a couple of steel drums determined for me the type of smoker I was to build: The Big Baby. The Big Baby uses a couple kits that are designed to turn a pair of steel drums into a cheap woodstove for camps and workshops (they're not the prettiest stoves). Here are a couple of other people who've documented the idea and here are some pictures of the progress.
First came the platform, made from a couple of pressure treated deckboard (1.25"x6"x8') with a generator wheel kit adapted to give it wheels on one side and some short legs made from 1" square aluminum tube with rubber feet.

Then the bottom barrel goes on a pair of legs and serves as the firebox. The bottom is lined with fire bricks to keep the bottom from quickly rusting out.
 |  |
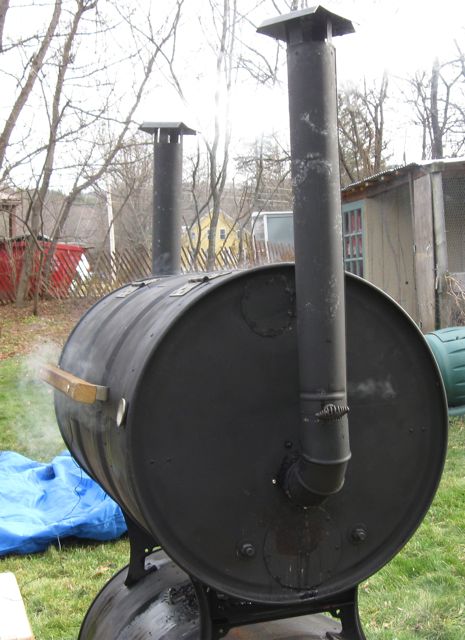
Then the top barrel goes on and serves as the smoke chamber/grill. There is a hinged door cut with some metal riveted around 3 sides of the doorway to catch the door and reduce the amount of smoke that gets out through the cracks. There is also a homemade handle made from a 1"x1" pressure treated board and some square aluminum 1" tube. Next to the door you can see a pair of grill thermometers stolen from my old smoker. The grill is just some expanded metal grate sitting on top of pieces of angle iron riveted along the inside walls of the top barrel.
 |  |
Obviously, God has been gracious to us in giving us the creativity with which to build such things, as well as the room to keep such a large contraption and the friends and family with which to share the wonderful food we can cook on it (and have cooked on it already, but that is a topic for another post . . .).
Some notes on the process for those who are interested:
- The barrels were sandblasted inside and out by a local guy to remove the existing paint and interior coating (and some rust), then they were repainted with stove paint that's made to take the heat.
- I added some makeshift dampers on the back of the bottom barrel by drilling holes in circular pieces of metal and riveting them to the drum and then drilling holes in the barrel to match. With a little wooden handle, the riveted circle spins and allows more air into the firebox. Before doing this, I had some trouble keeping the fire going since the only other air inlet is a small damper built into the stove door. Even now, the fire doesn't rage, but that's a good things for smoking.
- Some stove cement was used around the collars, stove doors, and vent pipes, but I never was able to get it to cure properly and most of it has cracked and fallen away. The directions on applying it tell you to spread it on and "slowly heat the cement to 500 degrees". It doesn't specify exactly what it means by "slowly" or exactly how to heat it.
- If I were to do it again, I'd probably put another pair of wheels on the other side of the platform (ones that could rotate, like the ones on those deck mowers) since it is a little heavy to lift and shove around the yard. Maybe next year I'll make some modifications
- In this same vein, I added a pretty heavy duty hand made with 2x6 boards and heavy lag bolts for lifting the side without wheels. It also serves as a small platform to set things when smoking, but I usually also bring out a folding tv tray. In the future I may build a better platform around the smoker for staging.
- I would also make the platform a little wider. It has once blown over and required a little banging to get the door back in shape. We've also turned it so that the normal wind direction doesn't hit it broadside.
- I would be remiss if I didn't also mention the cover that my wife made for it by sewing together three small tarps to fit. You can see an image of it on her blog here. I did well in finding a wife, but I'm sure you knew that already.


